• Home
  • About
  • Product Reviews
  • Things I Love
  • My Projects
  • Before and After
  • Our Home

1st-time Mom

~ Courage is fear that has said its prayers

1st-time Mom

Category Archives: My Projects

Dresser Progress Sneak Peak

29 Thursday Jan 2015

Posted by 1st-time mom in Antiquing, Chalk Paint, Do It Yourself, My Projects

≈ Leave a comment

Tags

Chalk Paint, DIY, Dresser Remodel, Sneak Peek

So here is a little sneak peak of the dresser right now.DSC_0191

As you can see I went with a Paris grey whitewashed look. I am really happy with how its turning out. I am about half way done painting it. The front and top are almost done, but I still have to paint the sides.  Also I still have to wax it and add a little more distressing.

I want to finish it by the weekend… but we shall see because we have a busy social schedule this weekend.

Have a great day!

Elza

My New Project

28 Wednesday Jan 2015

Posted by 1st-time mom in Antiquing, Chalk Paint, Do It Yourself, My Projects

≈ Leave a comment

Tags

Chalk Paint, French Dresser, New Project, Restoration

I have a new painting project.

A few days ago I got this lovely little French dresser from a thrift store. It has a few dings and scratches, but otherwise its a nice piece with dove-tailed drawers and solid construction.  However the finish is definitely dated.

20150127_233535 It might be hard to tell from the photograph but the finish is very cheap, and is actually some sort of laminate material over wood.  The grain is very fake looking, and the gold accent paint has a very craft store feel to it.

20150127_233545

The hardware on the piece is gorgeous however, with a lovely aged patina. Also I find the overall form of the piece to be pleasantly French inspired. So I’m hoping to transform it into something that looks a little more high-end.20150124_130620

I’ve been itching to get started on this project, but I have yet to go buy the particular paint color I want for this piece.  With all the snow we have been having, I haven’t had the chance to go buy it. Hopefully tomorrow I can go get some and start mixing some paint.

I will keep you updated with my progress.

Bye for now,

Elza


French Side-Table Makeover

23 Tuesday Sep 2014

Posted by 1st-time mom in Antiquing, Before and After, Chalk Paint, Do It Yourself, My Projects

≈ 4 Comments

Tags

Chalk Paint, DIY, Duck Egg Blue, French Side Table, Furniture makeover, Painting

Side Table 2I purchased this lovely little side table from craigslist.

This is how it looked like before I put some work into it.

The veneer was peeling up in multiple places. It had some deep scratches, and a few dents. Also a piece of the trim was broken off.Side Table1

(I had forgotten to take before pictures of it, because I dived right into the project. However the person who sold it to me was nice enough to email me his craigslist photos. :))

This piece had beautiful details,  and was made of solid wood.  Thus, even though it was in a rough shape, I knew I could work with it.Side Table 3

Deciding to paint it was an obvious choice. I had to fill in multiple imperfections with wood filler, and I had to take off some of the peeling veneer, thus staining the natural wood was not an option  I managed to completely built up the trim piece that was broken off with wood putty.  So, after some good sanding to make sure it all blended in with the old, the coat of paint made it look as good as new.  I used homemade chalk paint to paint the piece, and it gave it a nice buttery smooth finish.Side Table 4

I then went on to clear wax it, and then dark waxed it around the details and legs.  The dark wax deepened the color a bit, and gave it a more vintage appearance. I didn’t want the paint to look too new, and not match the style and age of the piece. The hardware on this was absolutely beautiful; it had a natural aged patina which I did not touch.Side Table 5

I really love the color I chose. It is a blue/green, which looks different depending on the light. It is very similar to Annie Sloans Duck Egg Blue, which some may be familiar with.

Well that’s all for now. I hope you guys like my projects. I have another one that I just finished, and will talk about in the near future.

As Always,

Elza 🙂

How to Reupholster a Chair

14 Sunday Sep 2014

Posted by 1st-time mom in Decorating, Do It Yourself, My Projects

≈ 1 Comment

Tags

DIY, Fabric, How To, Queen Anne Chair, Staple Gun, Upholstery

20140910_154316

Well I tried my hand at upholstery for the first time, and I’m glad I did. It was quit the learning curve, but actually not that hard when you do a little research.

My dad had purchased a set of Queen Anne chairs for me, and though I loved their shape, I wasn’t too keen on the style.  A little too Victorian for me.  (Don’t mind the fabric swatch)

20140910_165551

Also they were a little worn in some places.

20140910_165522

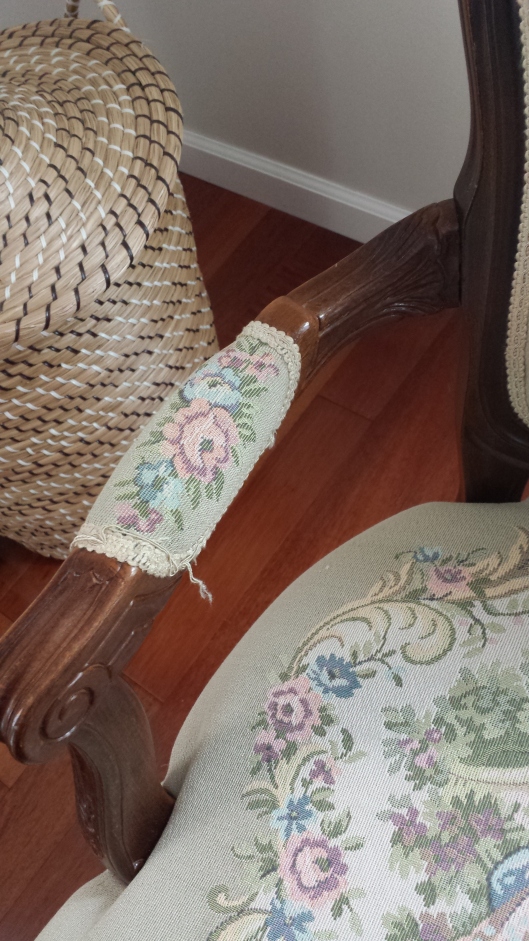
So I decided to try to redo them. How hard can it be?

I started by taking off the old fabric.  This was not all that easy. There were hundreds of staples holding it down. In some places if I tugged hard enough, I could pull up the fabric with the staples, but otherwise, I had to take out each staple one at a time. At first I tried to do this with just a flat head screw driver and pliers, but that wasn’t working so good. After jabbing myself several times with the screw driver and making very little progress, I eventually went out and purchased this special upholstery staple remover and it was a huge help.

812Wv3HQNiL._SX522_[1]I have to say this is a handy little tool to have for projects like this. I actually found mine at my local Walmart in the sewing/crafts section, but it is available on Amazon also.  20140824_215131Look at all those staples!! Had to take out each one! The padding on my chair was in good condition so I didn’t touch it.20140824_224450

Next I went and purchased some upholstery fabric, and cut it to the relative shape  of the old fabric I took off, adding several inches extra, so I could have something to hold on to when I needed to pull it tight.  So I placed my fabric onto the chair and began stapling. This is when the fun really began.

I thought I could do this with my regular old staple gun. However, I quickly realized that it will not work. Every time I tried to staple the fabric, the staples would either bend or not go all the way in.  I tried using different length staples, yet nothing worked.  Frustrated, I turned to Google for help.  As it turns out upholstery staples are a lot thinner than what your average staple gun uses.  Comparing the staples I pulled out to the ones I was using, I could definitely see that they were a lot thinner and had sharper tips. Good quality furniture is usually made out of hard woods. Ordinary hand held staple guns are made for softer construction material such as plywood.  The other option would be to use an automatic air staple gun, which would have enough force, yet is also not ideal, because 1. its expensive, 2.  it requires an air compressor, 3. the staples are still bulky and if you make a mistake pulling them out is not an option, and 4. you risk splitting the frame of your furniture.

So what did I do? Did I go and buy an upholstery staple gun that is only available for purchase online and costs about $60-$200 dollars?? Plus the staples another $30?

Nope!  I don’t have enough patience or money for that! 🙂  I went and wandered the aisles of home depot looking for another option.  ..and you know my friends some times I think I’m genius.  🙂

Exhibit A: This is your regular T-50 Staple gun. $17  –> for my purposes USELESS

a12ca78b-007c-456c-b37c-5aaf2a875ba9_400[1]

Exhibit B: Stanley Light Duty Staple Gun $8 –> IT WORKS!!05ff169b-2d1b-41f8-82f7-79ade07465ed_400[1]

So this Staple gun is like the little brother of the T-50.  He is a lot smaller and scrawnier looking, and probably would go unnoticed hanging right next to the bigger and stronger T-50.  Yet why did this little guy save the day? It so happens this staple gun uses thinner staples.  So I gambled with this purchase and won! It actually worked. The thinner staples easily went into my chair and my project could go on! You could thank me for this discovery later. 😉

I will say though, if you plan to reupholster often or something larger like a couch. You should probably invest in an upholstery stapler, because this does wear on your hands after a while.  However for me, the impatient casual DIYer if worked fine.

This is my chair after I finally finished stapling late in the evening, and trimmed all the extra fabric on the edges.20140825_202723

YouTube has some good videos about how to place the fabric when stapling. This video in particular was helpful. –> LINK

Lastly I went back to the fabric store and purchased some trim, which I hot-glued in place, hiding the fabric edge and staples.

I have been really loving the look of velvet upholstery lately.  It is becoming more and more in style.

These were some of my inspiration photos.  Most of these chairs cost $500 and up! Definitely not in my budget..

upholstery CollageI went with a beautiful sage green. It has a nice vintage wash to it, yet still looks modern. It was $25 a yard, but so worth it.  Total, this project cost me about $50. This includes fabric, trim, staple gun, staples, and staple remover.Chair

It looks fantastic in our bedroom.

Chair2

Now I just have to repeat the process with the second one. 🙂

Have a great day,

Elza

Antiquing with Chalk Paint

04 Thursday Sep 2014

Posted by 1st-time mom in Antiquing, Before and After, Chalk Paint, Decorating, Do It Yourself, My Projects

≈ Leave a comment

Tags

Antiquing, Chalk Paint, Clear wax, Distressing, Home Made Chalk Paint, Metal Horse, Painting

Chalk Paint Horse 1I have been experimenting with different painting techniques lately.  I purchased this lovely little metal horse at a thrift store and decided to test my antiquing skills using chalk paint.

Chalk Paint Horse 2As you can see in the before picture, this horse is cast out of a shiny metal material. Though it was nice as is, I felt it was a little too shiny for my taste, and I wanted to see if I could make it look older and accent some of the intricate details a bit more.

Chalk Paint Horse 3To get this result I mixed up some grey colored homemade chalk paint and painted on a thin coat. After it was dry, I clear waxed it.

20140904_080256To accent all the little details, I tinted some clear wax with brown and black acrylic paint, and then stippled it into the details with a paint brush. Then I wiped it away with a dry rag, leaving the dark wax only in the crevices of the piece.

20140904_080323Lastly, I took some coarse sand paper, and sanded off the paint on parts of the horse, in order to reveal the gold metal underneath. This gave it a really rich gilded look.20140904_081358

I really love the final outcome. It matches my décor perfectly and looks like its a really old antique piece. I had lots of fun with this project. When I started painting that first coat of paint, I thought “Oh Boy, I’ve killed this poor horse.”  However in the end I am very pleased with the results.

Have a great day!

Elza

P.S.

Let me know if you want more details about homemade chalk paint and tinting clear wax.

How to Decorate Easter Eggs

26 Tuesday Mar 2013

Posted by 1st-time mom in Baby, Decorating, Do It Yourself, Faith, Food, God, Home, My Projects, Parenting, Pregnancy

≈ 9 Comments

Tags

Christianity, Decoupage, Easter, Easter egg, Egg decorating, holiday, Traditions

So I wanted to do a little holiday inspired post.  Easter is around the corner, and I thought I would post a little tutorial on decorating Easter eggs.IMG_2321-2Usually we use candle wax to write or draw on the eggs and then dip them in dye. However I wanted to try something different. I came across this decoupage-style method, and I love how they came out, so I thought I would share.

To get started you need:

  • – eggs, hard-boiled (however many you want to decorate)
  • – 1 slightly whisked egg white
  • – a small brush 
  • – some pretty 3-ply napkins or pretty tissue paper

IMG_2314-2IMG_2334-2Separate the napkins so that you have only the top printed ply of the napkin. The thinner the napkin the better.I found that tissue paper worked well too, if you can find a pretty print that you like. Also, prints surrounded by white work best, because they blend better with the egg. Solid full-colored prints show creases more.

Cut out whatever piece of the print you want on your egg. Then hold the napkin against the egg and use the egg whites as you would Modge Podge to decoupage the napkin onto the egg.

IMG_2327-2-2

Smooth out any wrinkles, and then place them on a plate in the frig. to dry over night.  The next day rub a little oil over them to make them nice and shiny, and voila, you got some fancy looking Easter eggs you could use as decorations or serve.IMG_2319-2IMG_2327-2Technically you could eat these. Just peel the shell and there is a perfectly good egg inside. However I prefer them for decorative purpose. I made a little moss nest inside a bowl and will use them as part of an Easter table centerpiece. I like these because they remind me of Fabergé eggs, made popular by Russian Czars.

IMG_2323-2Did you know that the tradition of decorating eggs can be traced all the way back to the early Christians of Mesopotamia, who stained eggs red in memory of the blood of Christ, shed at his crucifixion.   In Christianity, they also symbolize the empty tomb of Jesus. Though an egg appears to be like the stone of a tomb, a bird hatches from it with life; similarly, the Easter egg, for Christians, is a reminder that Jesus rose from the grave, and that those who believe will also experience eternal life.  (Source: Wiki.)

Hope you have a blessed day,

-Elza-

About The Author


Welcome to my page!! Here you will find many of my daily inspirations, projects, and musings.
Enjoy!

How To Decorate Easter Eggs

Side Table Makeover

First Birthday Party

Recent Posts

  • Quarantine
  • Memories
  • Writing Prompt Aug. 10, 2015 “(Yawn) What Bores You??”
  • Writing Prompt Aug. 8 2015 “Everything Changes”
  • Dresser Progress Sneak Peak

Archives

Live Love Laugh

This slideshow requires JavaScript.

DIY Chair Reupholstery

Our Nursery

Baby Shower

Holidays

Christmas

My Sunshine

Categories

Enter your email address to follow this blog and receive notifications of new posts by email.

Blog at WordPress.com.

  • Follow Following
    • 1st-time Mom
    • Join 102 other followers
    • Already have a WordPress.com account? Log in now.
    • 1st-time Mom
    • Customize
    • Follow Following
    • Sign up
    • Log in
    • Report this content
    • View site in Reader
    • Manage subscriptions
    • Collapse this bar
 

Loading Comments...